Analytics » Import/Upload Data into Virtutem Analytics » Import Data from Files and Feeds
Import Data from Files and Feeds
Often you would already have data locally stored in tabular file formats like CSV, XLS (Excel), JSON, and HTML files. The data in such formats could also be available as a URL or Web feed or even some application generated. Virtutem Analytics offers easy import and copy-paste options of such data for jump starting your reporting and analysis. You can import the data into Virtutem Analytics by clicking the link Import from Files and Feed provided in any of the following contexts :
From Create Database option available in the Home page
Clicking the New Table option available (top-right corner, under the New > New Table toolbar menu) in the selected database page
On clicking the Import from Files and Feed , an import dialog will pop-up. The first screen of the dialog will be different depending on context from where you invoked this dialog.
If you had invoked this from under Create Reporting Database , the first screen will look like the following. In this screen, you need to provide the database name (unique and mandatory), description (optional) and tags (optional) describing the database. Other options are common and described below:
.png)
If you had invoked this from New Table option, the first screen will look like the following. In this screen you need to provide the Table name (unique within the database and mandatory), description (optional) and tags (optional) describing the table. Other options are common.
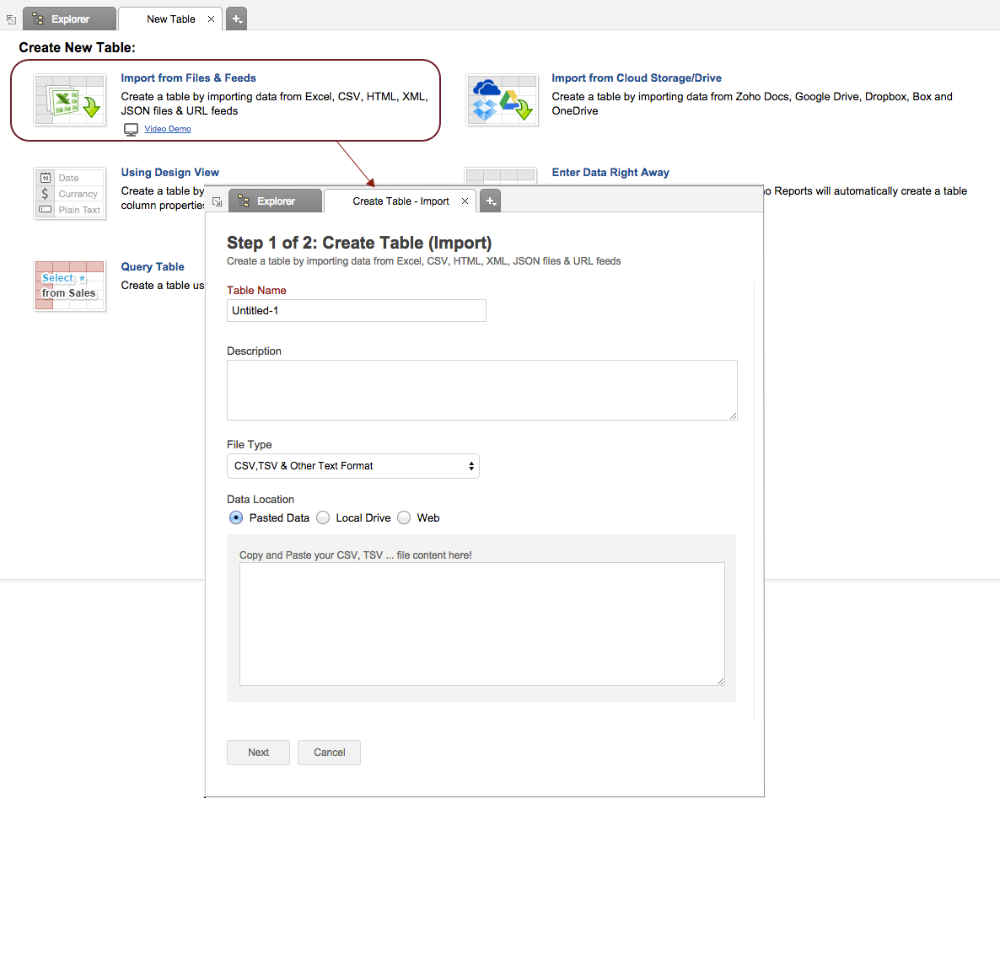
Currently Virtutem Analytics supports importing data from the following sources.
- Comma Seperated Value (CSV)
- Excel (XLS and XLSX) /SXC
- HTML
- Tabular Text files
- JSON
- XML
Choose the Data Location from where the input data file is to be loaded. You can choose any of the following:
- Pasted Data: Choose this option if you wish to copy and paste the data from the source file. Copy and paste the data from the necessary file into the text area given below. In the case of a HTML file format, you need to copy and paste the data along with the HTML tags in the file. Ignoring it will make the import to fail.
- Local Drive: Choose this option if you wish to load the data file from your local machine. On choosing this option, Browse and load the necessary file from your local machine.
- Web URL: Choose this option if you have the data file residing in a Web URL. You can import data from publicly accessible or from a secured URL. Choose the appropriate tab and then provide the full path to the URL in the field provided.
- URL - Choose this to import data from a publicly accessible URL.
- URL With Authentication - Choose this to import data from a secured URL. On choosing this, you need authenticate to access the URL either by providing username and password or through the parameters.
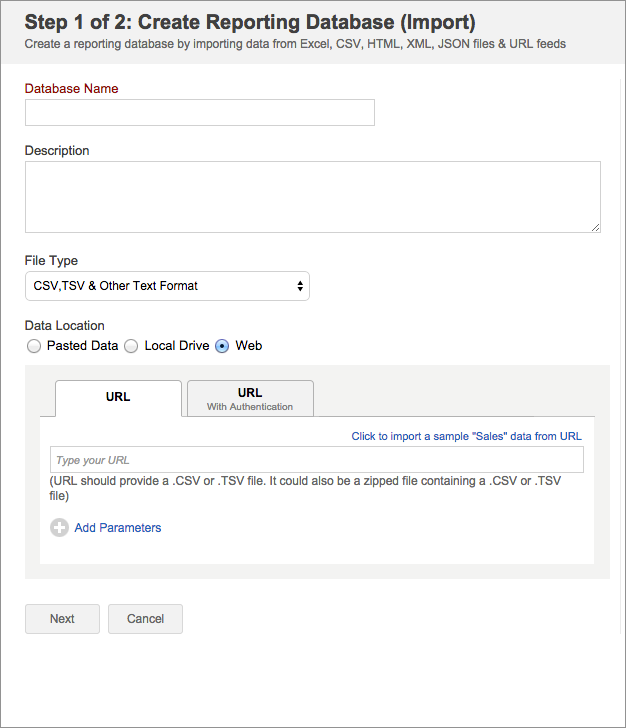
Once you have provided the data input, click on the Next button at the bottom to proceed to the next step.
| Note: |
|---|
|
In case you have chosen to import an HTML or Excel file, you will see a screen as shown below in Step 2.

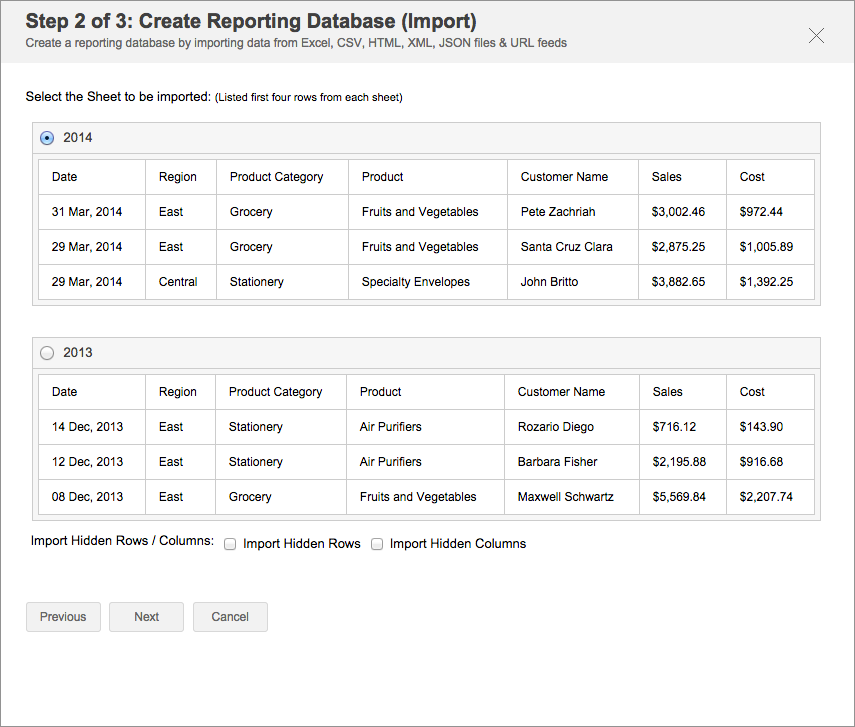
You will see the list of tables(sheets in case of XLS) that are present in the input file. You need to choose the table/sheet from which the data has to be imported. You can only import one table/sheet at a time. Once you had chosen the table/sheet, click on Next button to proceed importing.
If there had been no tables in the input HTML file, then you would not be able to proceed to the next step until you provide a valid input.
Importing Hidden rows/columns in Excel
When importing data from Excel file, if the excel table contains hidden rows or columns, by default, only the visible rows will be imported in to the Virtutem Analytics table. However, Virtutem Analytics also allows you to import the hidden rows/columns by providing corresponding options under Import Hidden Rows/Columns option in this step of the wizard. Options provided are:
- Import Hidden Rows - By selecting this option, any hidden rows in the excel sheet will be imported.
- Import Hidden Columns - By selecting this option, any hidden columns in the excel sheet will be imported.
Virtutem Analytics supports importing data from JSON files. To do this set the File Type as JSON and select the required file or paste the JSON format in the Pasted Data field.
| Note |
|---|
You can import any type of JSON array with single or multiple objects. It is mandatory that the first row should contain column headers for importing JSON file. In case you import file with multiple JSON objects separated by comma (not enclosed with square brackets), then the first object alone will be imported. JSON object containing simple values without keys are not supported. Refer to the supported JSON formats section, for more details on the JSON format that can be imported into Virtutem Analytics
|
In this step you would be prompted to provide the necessary settings for Virtutem Analytics to properly understand the data being imported.
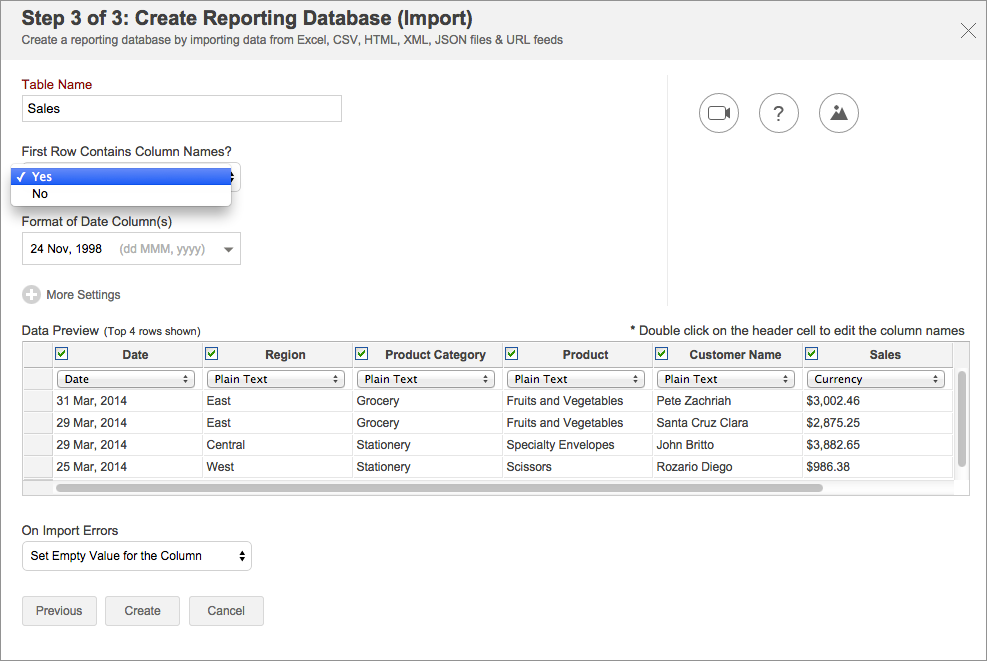
The settings that are to be provided are described below:
- First Row Contains Column Names: If the first row of the data being imported contains the columns names, then choose Yes , if not No . Virtutem Analytics will try to intelligently identify whether the first row contains column names and set the option automatically. You can verify this and override/reset it accordingly. It is recommended that the first row contains the column names. This would enable Virtutem Analytics to use the same column names while creating the table to store the data imported. If the imported data does not contain the column names in the first row, then Virtutem Analytics will generate its own column names and create the table. You can edit these column names subsequently after the table has been created.
- Date Format of the column(s): In case the imported data contains a date column, then you need to provide the date format of the same for Virtutem Analytics to correctly import it. By default, Virtutem Analytics tries to identify the date format of the given date column from the data provided and display the same in this field. If you find that to be incorrect or if Virtutem Analytics had failed to recognize any date column then you can set the date format by clicking on the link Choose matching date format... just below that date field. To know more about choosing the matching date format follow this link .
- More Settings: Clicking this option will expand the dialog box and provide more import settings appropriate to the file type being imported.
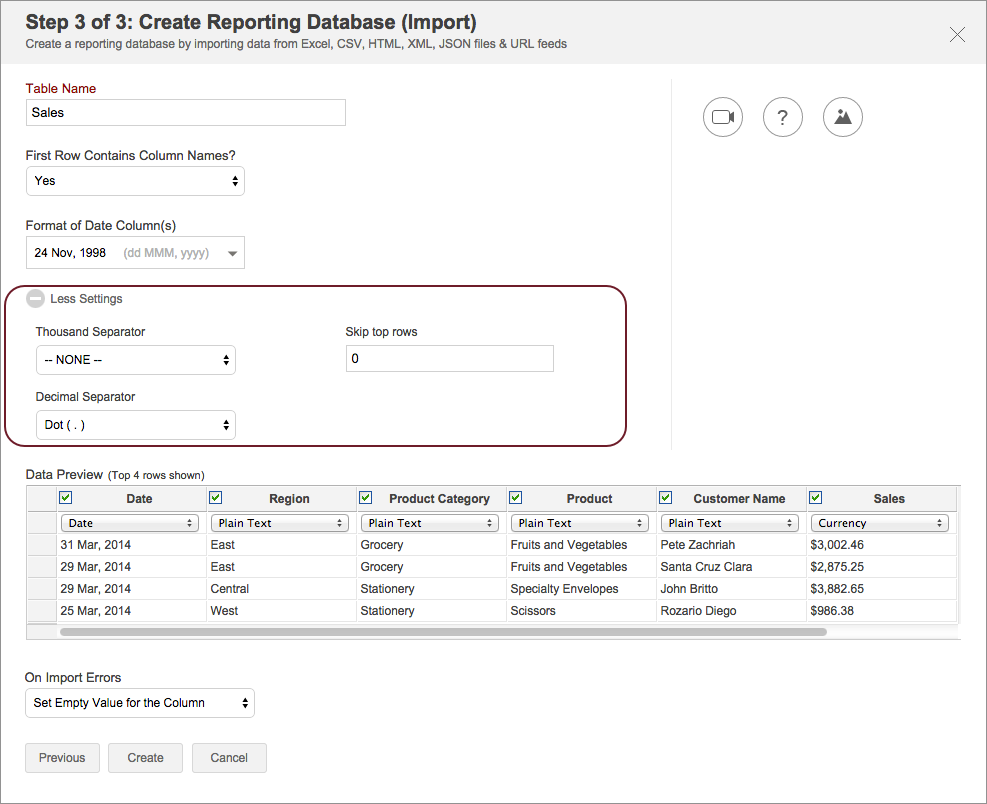
- Delimiter separating your column(s): Specify the delimiter character which separates the data in one column from the next. Comma would be the default. If not, you could choose what is relevant for your data set which could be any of Comma, Tab, Semicolon and Space.
- Skip top row(s): Specify the number of rows to be skipped or ignored by Virtutem Analytics from the top of your data file being imported. This is optional and the default would be 0 i.e., no rows will be skipped.
- Text Qualifier: If the string values in the data imported are enclosed within Single quote or Double quote, specify the same in this option. The default value is NONE.
- Comment Character: If some rows in the data imported are commented and are to be ignored, then you need to specify the comment character that is used to indicate the same. Note that the specified comment character should be present as the first character in that row, if that row has to be ignored.
- Thousand Separator: This option lets you to choose your own thousand separator to be used for data types like number, positive number, decimal number and percentage. The default value is NONE.
- Decimal Separator: This option allows you to choose your own decimal separator to be used for data types like decimal number and percentage. The default value is DOT.
Preview:
Virtutem Analytics shows a preview of the data being imported by displaying the first 3 rows in a tabular format as shown below.
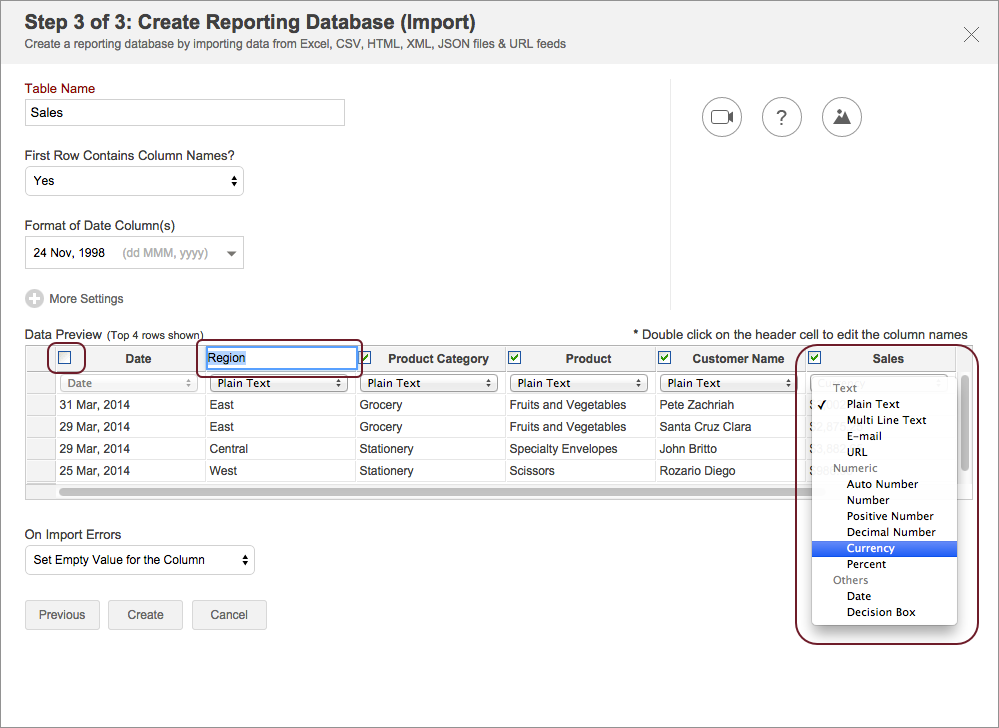
In the preview table shown you can verify the column names and the column type of the data being imported. If required, you can change the same too.
To change a Column Name , double click on the corresponding column header. This will switch the header into edit mode. You can then provide the required name and press the Enter key to set the same.
To change the Column type , choose the type from the drop list provided under each column. Ensure that you specify the right column type. Specifying a wrong type will generate errors on import and make Virtutem Analytics to ignore the value in that corresponding column while importing.
On Import Errors:
You could specify how Virtutem Analytics should handle errors condition (incase it occurs) while importing data. The following are the possible options:
- Set Empty Value for the Column (default) - Select this option to set empty value to the corresponding column value which had problems while importing.
- Skip Corresponding Rows - Select this option to skip the corresponding rows in which an error occurs while importing.
- Don't Import the data - Select this option to abort the import process, if any error occurs during importing.
In case any error occurs during import, the details of the same would be shown in the Import Summary dialog (refer the next section below) which would be shown on Import process completion.
Once you have set all the options, click Create button provided to proceed Importing the data.
Once Virtutem Analytics imports the input data provided, it will bring up a Import Summary dialog as shown below, capturing the status of the Import process just completed.
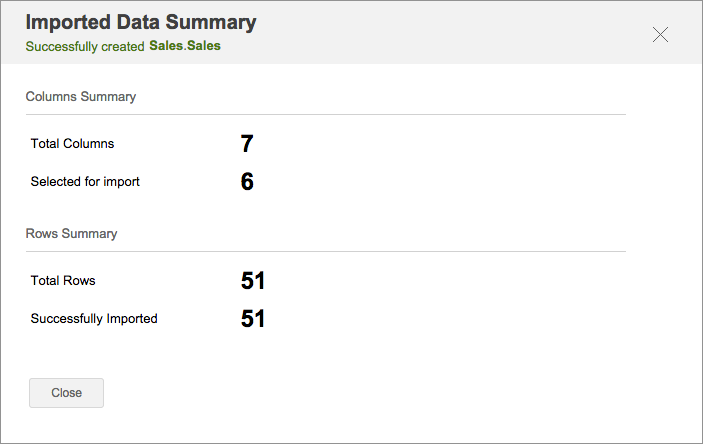
The details that would be shown include:
- Column Details: Total number of columns in the input data and the total number of columns that where actually selected for import
- Row Details: Total number of rows in the input data and the total number of succesfully imported rows in it.
- Error/Warning Details: If there were any errors/warning generated during the import process, it would be listed under the Details section.
If you import data from an URL, you would see a link Would you like to schedule this import periodically? which you can use to setup periodic import of data from this URL. Follow this link for more details.
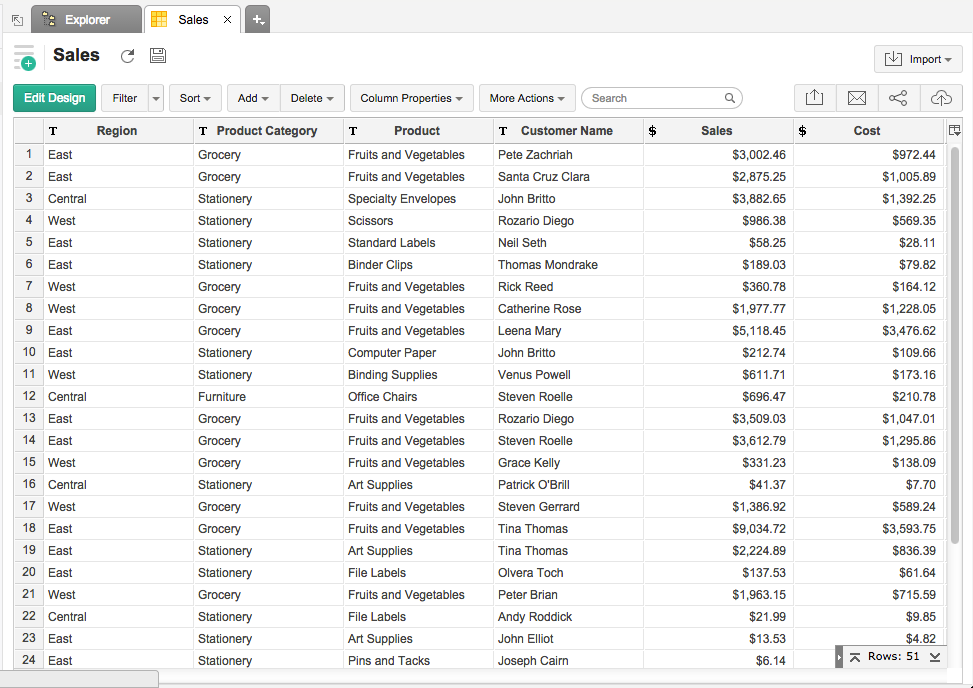
On closing the Summary dialog, Virtutem Reports will display the newly created table with the data loaded in the same.
You could setup scheduled imports data from your cloud storage using the Would you like to schedule this import periodically? link in the Import Data Details dialog or from a existing table. You can schedule the data import from a Web URL.
Import Scheduling Options
The following are the sceduling options available in Virtutem Analytics:
- Table Name - Displays the table name for which you schedule the import. This is not editable.
- File Type - Displays the file type from which the data is imported (e.g., CSV, XLS etc., ). This is not editable.
- URL - Provide the Web URL from which the data is to be imported.
- URL - Choose this to import data from a publicly accessible URL
- URL With Authentication - Choose this to import data from a secured URL. On choosing this, you need authenticate to access the URL either by providing username and password or through the parameters. The user credentials will be encrypted and saved in the server to be used for each import. This will be deleted when the Import Schedule is removed.
- How do you want to Import? - Choose how do you want to import from this drop-down list. Available options are:
- Add records at the end - Use this option to append imported records to the end of the table .
- Delete existing records and add - Use this option to delete entire records in Virtutem Analytics table and add the new records into the table.
- Add records and replace if already exists - Use this option to update the already existing records in the table with the new values and append the new records at the end of the table.
- Add records, replace existing and delete missing record - Use this option to update the already existing records with the new values, append new records to the end of the table and delete records that are not available in the file but present only in the Virtutem Analytics table.
Note: When Add records and replace if already exists or Add records, replace existing and delete missing record is selected, it is mandatory to specify matching columns using the Select the column(s) to match existing records option. You can choose one or more columns as matching columns. Virtutem Analytics will use the values in these columns as the key to match the existing records with the new records being imported. Hence the matching column(s) combination should uniquely identify each record in the table. Once a match is identified, then Virtutem Analytics will update that existing record in the table with the new record values present in the data being Imported. In case there is no match found, those records will be appended to the end of the table.
- Schedule Settings - This group box provides options to schedule the import.
- Repeat - Specify the schedule interval from the drop-down list. Available options are.
- Every 'N' hours - Choose this option to schedule the import every 'N' hours i.e., every 2 hour or 6 hours. On choosing this option, specify the time interval to import the data.
- Every Day - Choose this option to schedule the import at a particular time everyday. On choosing this option, specify the time to import data.
- Weekly Once - Choose this option to schedule the import once in a week on a particular day. On choosing this option, specify the day of the week and the time to import the data.
- Monthly Once - Choose this option if you want to schedule the import once in a month on a particular day. On choosing this option, specify the day of the month and the time to import data.
Note : Schedule time need to be specified in GMT +0:00 timezone.
- Notify me after every - In case of import failure you will be notified. You can specify after how many failures you need to be notified.
- Repeat - Specify the schedule interval from the drop-down list. Available options are.