Analytics » Upload Tool » Uploading Data from NoSQL Databases
Uploading Data from NoSQL Databases
If you have any applications that stores data in NoSQL databases like MongoDB, Cassandra, Apache Hadoop Hive, Cloudera Hadoop and Hortonworks Hadoop, then you can use Upload Tool to pull data from your databases and upload the same into Virtutem Analytics.
In this section, we will discuss about how to upload data from your local databases into Virtutem Analytics . You can also read about how to configure the Upload tool to periodically upload/synchronize the data from your databases into Virtutem Analytics .
Downloading Upload Tool
Virtutem Analytics Upload Tool can be downloaded from this page .
Installing and Configuring
You learn more on installing the upload tool and configuring the common parameters (like proxy settings etc., ) for the tool at this page.
You could also upload data from your Local NoSQL databases like MongoDB, Cassandra etc., using the Upload tool. To do this, you need to download and install the Upload tool in your local network and set the proxy setting (if your network has a proxy server setup). Ensure that the Upload tool can connect to your database from the machine in which its installed.
The following table consists of the default setting for connecting MongoDB.
| Database | DBTYPE | Port (default) |
| Mongodb | mongodb | 27017 |
The example in the following screenshot illustrates the connection settings for MongoDB.
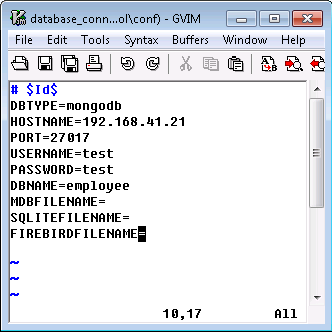
The following are the parameters that are to be given in database_connection_params.conf file of the Upload tool:
| DBTYPE | Specify your local NoSQL database type as mongodb |
| HOSTNAME | Host name of your computer in which the database is running, i.e., the name of the computer where your database is running. |
| PORT | The port number used by the database server. (Refer to the above table to know the default port number of MongoDB). |
| USERNAME | Your local MongoDB database login name. |
| PASSWORD | Password for accessing your local MongoDB database. |
| DBNAME | Your local MongoDB database name from which the data is to be uploaded. |
Once you have configured the above setting, you need to provide the MongoDB find queries that are to be executed in your local database to fetch data and upload the same into Virtutem Analytics . To learn about how to specify these queries and executing the upload tool click here.
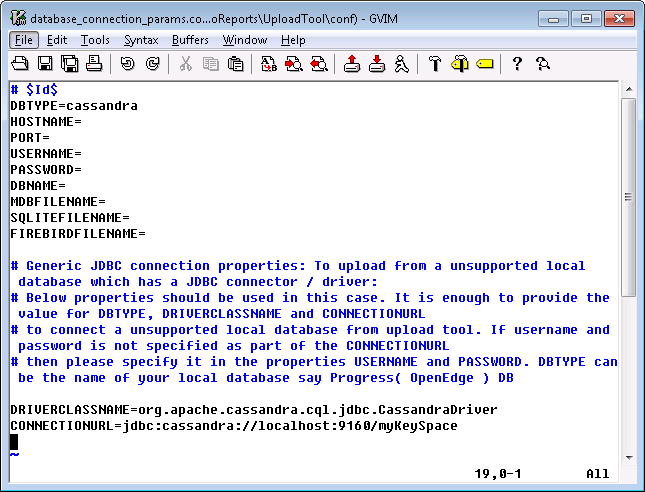
The following table consists of the default setting for connecting to a NoSQL Database that support JDBC (Java Database Connectivity) driver connectivity.
| Database | DBTYPE | Driver Class Name | Connection URL | Port (default) |
| Apache Cassandra | cassandra | org.apache.cassandra.cql.jdbc.CassandraDriver | jdbc:cassandra://<hostname>:<port>/<keyspacename> | 9160 |
You can download the Cassandra JDBC driver from here .
| Database | DBTYPE | Driver Class Name | Connection URL | Port (default) |
| Apache Hadoop Hive | apachehive | HiveServer JDBC Driver: org.apache.hadoop.hive.jdbc.HiveDriver | HiveServer Connection URL: jdbc:hive://<hostname>:<port>/<dbname> HiveServer2 Connection URL: jdbc:hive2://<host>:<port>/<dbname> | 10000 |
| Cloudera Hadoop Hive | clouderahive | HiveServer JDBC Driver: org.apache.hadoop.hive.jdbc.HiveDriver | HiveServer Connection URL: jdbc:hive://<hostname>:<port>/<dbname> HiveServer2 Connection URL: jdbc:hive2://<host>:<port>/<dbname> | 10000 |
| Hortonworks Hadoop Hive | hortonworkshive | HiveServer JDBC Driver: org.apache.hadoop.hive.jdbc.HiveDriver | HiveServer Connection URL: jdbc:hive://<hostname>:<port>/<dbname> HiveServer2 Connection URL: jdbc:hive2://<host>:<port>/<dbname> | 10000 |
Note: Related JDBC driver will be available in the Hive and Hadoop install directory of the corresponding database.
The following are the steps to connect the database using JDBC Driver:
- Copy the related JDBC driver(JDBC jar file) into the <UploadTool_Home>/lib directory.
- Open the <UploadTool_Home>/conf/database_connection_params.conf file and configure the following parameters:
| DBTYPE | Specify your local database type (Type of the database you are connecting such as cassandra or clouderahive etc.,) |
| DRIVERCLASSNAME | Specify JDBC driver class name (refer to the tables above) |
| CONNECTIONURL | Specify database URL with or without username and password to establish connection with the local database |
| USERNAME | Specify the USERNAME to access the database. This is not required if you have specified authentication details in CONNECTIONURL |
| PASSWORD | Specify the PASSWORD to access the database. This is not required if you have specified authentication details in CONNECTIONURL |
The following screenshot illustrates the connection settings for a Cassandra database.
Once you have configured the above setting, you need to provide the SQL SELECT queries that are to be executed in your local database to fetch data and upload the same into Virtutem Analytics . To learn about how to specify these queries and executing the upload tool click here.
The database_sql_queries.xml file contains all the settings related to the SQL SELECT Queries ( find query incase of MongoDB) that are to be executed in the database for fetching the required data, along with settings about the Virtutem Analytics database and table names into which the data is to be uploaded. To fetch data from your NoSQL databases, you need to specify SQL SELECT query . To fetch data from MongoDB, you need to specify MongoDB Queries discussed in a separate section below.
As part of the <Query> node, you also need the provide details about the Virtutem Analytics database into which the data that is fetched from executing the query is to be uploaded. The following table explains all the parameters to be provided as part of the <Query> node.
| Parameter | Description |
| dbname | The Virtutem Analytics database name into which the data is to be uploaded after executing the SQL Query. |
| tablename | The Virtutem Analytics table name into which the data is to be uploaded after executing the SQL Query. |
| importtype | Set one of the following as Import Type . · APPEND - appends the data to the end of the table. · UPDATEADD - updates existing data records and appends new data records. For this you need to configure ZOHO_MATCHING_COLUMNS in the common_params.conf in the conf directory. · TRUNCATEADD - Deletes the existing data and adds new data. |
| matchingcols | This is applicable only when the importtype is set to UPDATEADD. |
| selectedcols | The column names separated by comma. Only these columns are uploaded from the resultant query data into the online database. |
| skiptop | The number of rows to be skipped from the top in the resultant query data before being uploaded. |
| sql_query | Specify the SQL SELECT query to be executed in the local database for fetching the necessary data. |
To fetch the data from NoSQL databases you need to provide the necessary SQL SELECT queries that are to be executed in the database. These queries will be executed by the upload tool in your local database to fetch the necessary records and upload the same into Virtutem Analytics according to the settings provided.
You can provide any number of SQL SELECT queries to execute. Each query is to be provided in a <Query> <Query> XML element. Multiple queries can be grouped within the <Queries> <Queries> element.
The following screenshot illustrates a sample SQL SELECT queries in the database_sql_queries.xml file.
%20(1).png)
The above example queries will fetch data from two tables and import the same into Virtutem Analytics reporting database MyDB . Data from the dbtable1 will be appended into mytable1 in Virtutem Analytics . And data from dbtable2 , where the employee number is less than 1000, will be added into mytable2 after deleting the existing data.
The following is the SQL SELECT query format to be followed to fetch data from your database.
<Query dbname ="virtutem_analytics_dbname" tablename ="virtutem_analytics_tablename" importtype =" APPEND / TRUNCATEADD / UPDATEADD " matchingcols ="matching_cols_for_updateadd" selectcols ="columns_to_import_from_csv" skiptop ="number_of_rows_to_be_skipped">sql_query_ to_be_executed</Query>
Note: You can use the above SQL SELECT queries to fetch data only from NoSQL databases which support JDBC driver connectivity (except MongoDB).
To fetch data from MongoDB, you need to provide the necessary MongoDB collection and find query details that are to be executed in the database. These queries will be executed by the upload tool in your local MongoDB database to fetch the necessary records and upload the same into Virtutem Analytics according to the settings provided.
You can execute multiple MongoDB find queries together. Each query is to be provided in the within the XML node<Query> </Query>. For each query you need to provide the Collection name, field names, field alias names and find query. Multiple queries can be grouped within the <Queries> </Queries> element.
Note: |
|---|
By default, MongoDB Query node will be commented. If the database type is MongoDB, then uncomment <Query> node for MongoDB and comment or delete the <Query> node for SQL Queries. |
The following screenshot illustrates sample MongoDB queries in the database_sql_queries.xml file.
The above example queries will fetch data from a collection and import the same into two tables in Virtutem Analytics reporting database MyDB . In the first query data from the collection employeeDetail , where the date of birth is after 2nd April 1989 will be fetched and will be appended at the end of the existing data in mytable1 table in Virtutem Analytics. Also it has mapped the source database field name against the column in Virtutem Analytics i.e., data from name.firstName field will be imported into firstName column in Virtutem Analytics table.
In the second query, all the data from the same collection will be added in the mytable2 after deleting the existing data. It will be imported with the same column name.
The following is the MongoDB query format to be followed to fetch data from your database.
<Query dbname="virtutem_analytics_dbname" tablename="vitutem_analytics_tablename" importtype="APPEND/TRUNCATEADD/UPDATEADD" matchingcols="matching_cols_for_updateadd" selectcols="columns_to_import_from_csv" skiptop="number_of_rows_to_be_skipped">
<CollectionName>collection name to fetch</CollectionName>
<FieldNames>Field names separated by commas</FieldNames>
<FieldAliasMapping>Field alias names as fieldname : field alias name separated by commas</FieldAliasMapping>
<Find>find query to fetch the required documents</Find>
</Query>
| Note: |
|---|
| CollectionName node is mandatory. FieldNames , FieldAliasMapping and Find nodes are optional. If the < FieldNames > node is not specified, then field names will be generated from first 100 documents or records. FieldAliasMapping is used to map your source database(MongoDB) column against the column in Virtutem Analytics . FieldNames are mandatory, if FieldAliasMapping is provided. For Querying ('Find' node in XML) MongoDB Extended JSON , follow the Strict Mode format which alone is supported by Virtutem Analytics Upload Tool |
Important Limitations:
The following data types are not supported and these types will be imported as empty / null into Virtutem Analytics . Aggregation framework are also not supported.
- data_binary
- data_timestamp
- data_ref
- data_minkey
- data_maxkey.
The configuration file common_params.conf in /conf directory provides parameters that Upload Tool uses while uploading data. These import settings help Virtutem Analytics properly understand the data being imported.
The following table lists the import parameters that can be configured in the common_params.conf file for uploading data from your local database.
Note: You will not find all the below given parameters present in the configuration file (except mandatory ones). In case you do not find them, add them into the file and provide the required value as specified below.
| Parameter | Possible Values | Description |
| ZOHO_CREATE_TABLE | · True · False | Optional · True - New table will be created in the specified database with the said name and then the data will be imported. If the table already exists in the database, then the data will be imported into it. · False - The data will be imported into the specified table. If the table does not exist in the specified database then it throws an error. Default value is false. |
| LINES_TO_SEND |
| Optional |
| ZOHO_THOUSAND_SEPARATOR | · 0 · 1 · 2 · 3 | Optional · 0 - COMMA · 1 - DOT · 2 - SPACE · 3 - SINGLE QUOTE Default is 0. |
| ZOHO_DECIMAL_SEPARATOR | · 0 · 1 | Optional The following is the list of parameter values and the corresponding decimal separator. · 0 - DOT · 1 - COMMA Default value is 0. |
| SET_EMPTY_FORNULL | · True · False | This parameter is used to specify whether empty value or null should be added in Virtutem Analytics table when the uploaded database contains null value. · True -The null values in the local database server will be added as empty values in Virtutem Analytics table. · False - The null values in the local database server will be added as null in Virtutem Analytics table. Default value is false . |
| ZOHO_CANOVERRIDE | · True · False | Optional · True - The tool will stop the current import process and overwrite the table with new import. · False - The tool will not disturb the current import process and will cancel the new import request. Default value is false. |
| ZOHO_ON_IMPORT_ERROR | · ABORT · SKIPROW · SETCOLUMNEMPTY | This parameter controls the action to be taken in case there is an error during import. · ABORT - In case of any error, the import will be aborted. · SKIPROW - In case of any error, the specific row(s) in which error occurred will be skipped and then continue importing the rest of the data. · SETCOLUMNEMPTY - . In case of any error, the value of the specific cell(s) in which error occurred will be set to empty and then continue importing the rest of the data. Default value is SETCOLUMNEMPTY |
| ON_ERROR | · 0 · 1 | Optional · 0 - Tool will abort if any error occur · 1 - Next query will get executed and upload Default value is 0 |
| ZOHO_TRUNCATE_COLNAMES | · TRUE · FALSE | Optional · TRUE - Tool will truncate the column names to 100 character · FALSE - Tool will abort Default value is FALSE. |
Once you have configured the parameters related to the SQL SELECT Queries or MongoDB queries and Import setting, you can run the UploadFromDB.bat/UploadFromDB.sh file with the required parameters as explained in the following sections to perform the upload. After successful execution, the data will get uploaded to the specified table in Virtutem Analytics database. The last upload details will be logged in the <UploadTool_Home>/logs/tool0.log files. The error details will be logged in the <UploadTool_Home>/logs/error0.log file .
| Note: |
|---|
In case there is any failure in executing any of the given SQL Query, then the upload tool will abort the execution of that query and the ones that follow. Whatever queries that had been successfully executed and uploaded into Virtutem Analytics till then will not be rolled back. |
Uploading Data Using AuthToken ( recommended option to avoid exposing your password )
In case you do not want to expose your Virtutem Account password or you have registered in Virtutem Analytics using other login such as Google Apps, Gmail, Facebook & Yahoo and do not have a Virtutem user credentials, then you can use AuthToken to upload data.
UploadFromDB.bat <virtutem_login_email_address> -A <authtoken>
| · User Email Address (virtutem_login_email_address): | Your Virtutem Analytics account login E-mail ID. |
| · AuthToken: | Authentication Token to authenticate access your Virtutem Analytics Account. |
Follow the steps given below to generate a AuthToken:
- Login to your Virtutem Analytics account.
- Navigate to the below URL in a new tab. https://accounts.virtutem.com/apiauthtoken/create?SCOPE=virtutemanalytics/reportsapi
- AuthToken for your account will be generated, as given below (the value for the parameter AUTHTOKEN in the response given below, is the acutal AuthToken for your account.
Note: Authenticating the user to upload data using AuthToken is supported only in the latest versions (released on June 17th 2013 or after). It is strongly recommended to use latest Upload Tool. To download the latest version of the Upload Tool, click here .
.png)
To know about all supported parameters and the value to be specified, click here .
Uploading Data Using Login Email ID and Password
You can also use login email address and password to authenticate for uploading data as given below.
UploadFromDB.bat <virtutem_login_email_address> <virtutempassword>
| · User Email Address (virtutem_login_email_address): | Your Virtutem Analytics account login E-mail ID. |
| · Virtutem Password (virtutem_password): | Your Virtutem Analytics account password. |
| Important Note: |
|---|
If you have enabled Tow Factor Authentication(TFA) for your Virtutem Account, then the above method of specifying Email Address and Password will not work. You need to disable TFA to use your Virtutem password in Upload Tool. If you are executing multiple instances/installation of Upload Tool to upload data, then it is recommended to authenticate using AuthToken. It is strongly recommended to use AuthToken in the Upload Tool by specifying -A instead of specifying as mentioned in the above section. |
To know about all supported parameters and the value to be specified, click here .
Uploading Data by Shared Users
In case the data is been uploaded by a shared user, then it is mandatory to specify the database owner (or database administrator) in the command line as given below.
UploadFromDB.bat <virtutem_login_email_address> -A <authtoken> -D <database_owner_login_e-mail_address>"
| · User Email Address(virtutem_login_email_address: | Shared users Virtutem Analytics Login E-mail ID. |
| · AuthToken: | Shared users' AuthToke. To know how to generate an AuthToken, refer here. You can also authenticate using Virtutem Analytics account password. |
| · Database Owner Login E-mail ID (database_owner_login_e-mail_address): | Virtutem Analytics Login E-mail ID of the database owner (or database administrator). |
To know about all supported parameters and the value to be specified, click here .
| Note on Specifying Authentication Details: |
|---|
|
| Parameter Name | Description |
| User Email Address(virtutem_login_email_address) | Your Virtutem Analytics account login E-mail ID. |
| AuthToken | AuthToken is a permanent token to authenticate a user to access his/her Virtutem Analytics account. Click here to know how to generate AuthToken. |
| Password (virtutemanalytics_password) | Password for accessing your Virtutem Analytics account. |
| Database Owner Email Address (database_owner_login_e-mail_address) | In case of uploading data in shared database, specify the database owner (or database administrator) login E-mail ID. |
Using Upload Tool you can periodically schedule uploading data from your local database. With this mechanism, you can have the latest data from your application synced into Virtutem Analytics , and the reports that you create over this data stay current.
You can setup a periodic schedule for both the CSV Console mode utility as well as the Database Upload utility using the Operating System Scheduler feature as explained below.
Setting up Schedule in Windows Operating System
- Click Start -> Settings -> Control Panel ->Scheduled Tasks.
- Click Add Scheduled Task. The " Schedule Task " wizard will open.
- Click Action > Create Task to open the Create Task dialog.
- Open Action tab and then click New .
- Click Browse button and select the upload tool command line batch file UploadFromDB.bat in the Program/Script field. Ensure that you have provided the necessary settings in the Upload tool configuration files.
- In the Add Argument field enter the following command line arguments.
UploadFromDB.bat <virtutem_login_email_address> -A <authtoken>
| Example: |
|---|
UploadFromDB.bat eduardo@zillum.com bad18eba1ff45jk7858b8ae88a77fa30 |
.png)
- Specify the time of schedule in the Start in field.
- Click OK to save the task.
Setting up Schedule in Linux or Mac Operating System:
- In Linux, you can use the crontab command for scheduling the migration process using the command line script UploadFromDB.sh (Checkout Simple Help on Linux Crontab command )
- Ensure you have provided the necessary setting in the Upload tool configuration files.
Points to consider, while scheduling periodic upload using Command line mode:
- It is the users responsibility to ensure that the latest data is uploaded into Virtutem Analytics by setting the schedule interval accordingly . Also ensure that you have provided the appropriate SQL Select query to pull the data.
- In case you have deleted few records in the tables in your local database being uploaded, the only option to remove these records from Virtutem Analytics database is to set the Import Type as TRUNCATEADD . This will delete all the records in the corresponding table in Virtutem Analytics and then add the data newly fetched records from the local database into Virtutem Analytics .
- In case you have modified few records in the tables in your local database being uploaded, then to get this modified in Virtutem Analytics database set the Import Type as UPDATEADD and specify the matching columns. The Upload Tool will compare the records in the corresponding table in Virtutem Analytics with the data being uploaded from your local database table based on the matching columns. If the record already exists in the Virtutem Analytics table then it will be replaced with the new values available from the local database. If not, it will be added as new records in Virtutem Analytics .
To view the data that you have uploaded:
- Login to http://analytics.virtutem.com
- Click on the corresponding Database name under My Databases
- Click on the corresponding table at the Left to open the table and view the uploaded data.
Frequently Asked Questions
- Can I use my Yahoo / Gmail / Google Apps / Facebook user credentials to upload data using Upload Tool?
- How to increase / decrease the batch size for upload?
- Can I allow the shared user to upload the data into my table?
- Can I use my Windows authentication to connect to SQL Server database and fetch records to upload into Virtutem Analytics?
- Can Upload tool be used to upload data from remotely hosted databases (SQL Server, Oracle,MySQL, Sybase, PostgreSQL, DB2 and DB2-AS/400) into Virtutem Analytics?
- How to connect to a database in a particular SQL Server Instance and upload the data into Virtutem Analytics Online Reporting Database?
- Is it possible to fetch data from multiple database using Upload Tool?
- Is it mandatory to follow similar column names in Virtutem Analytics table as available in my local database?
- How to upload data with different date format from the in-house/local databases into Virtutem Analytics?
Troubleshooting Tips
- I get "The host did not accept the connection within timeout of 15000 ms" while trying to upload data using Upload Tool. How to solve it?
- I get an error message as ‘out of memory’ while trying to upload the file. How can I solve this error?
- I get "Error!!! Sorry, you cannot upload files that exceed 50MB in size"while uploading data using Upload Tool. How to overcome this?
- I get an error message as "Another import is in progress in this table started by the user 'User name' at 'time of import'." How to overcome this?
- I get a message as "ZOHO_MATCHING_COLUMNS is not present in the request parameters list". How to solve it?
- I get "Error!!! Column "Column_Name" is present in match columns but not in selected columns" while uploading data. How to overcome this?
- I get an error message as "Maximum Concurrent User Tickets Limit Exceeded". How to solve this?
- I get "Could not Find File '(unknown)' error while trying to import data from MSACCESS 2007 to Virtutem Analytics. How to overcome this?
- While uploading data from MySQL database, I got the error "Value '0000-00-00' cannot be represented as java.sql.Date". How can I overcome this error?