Analytics » Upload Tool » Uploading Data from CSV Files - Console Mode
Uploading Data from CSV Files - Console Mode
Invoking Upload Tool using the Command line mode (console mode) will be useful when you want to upload data periodically using a scheduler or when you have to invoke the tool from another application. In this section, we will discuss how to set up this tool for batch upload of CSV data in Command line mode .
Steps for running the CSV upload tool in console mode:
- Ensure that you have already created the database in Virtutem Analytics account into which the data is to be uploaded. To know how to create a database, click here
- Configure the proxy settings and the required Import settings in the common_params.conf file. Read more about these configuration settings from the Proxy Settings and Import Settings sections.
- Run the CSVUploadConsole.bat / CSVUploadConsole.sh file under <Tools_Home> bin directory along with the required parameters. You have to provide full path of the CSV file to be uploaded, Virtutem Analytics Database name, Table name, Type of Import, Virtutem Analytics User Name and Password in the same order as given in the following snippet.
CSVUploadConsole.bat [file_name] [database_name] [table_name] [APPEND/UPDATEADD/TRUNCATEADD] <virtutem analytics_username> < virtutem analytics _password>"
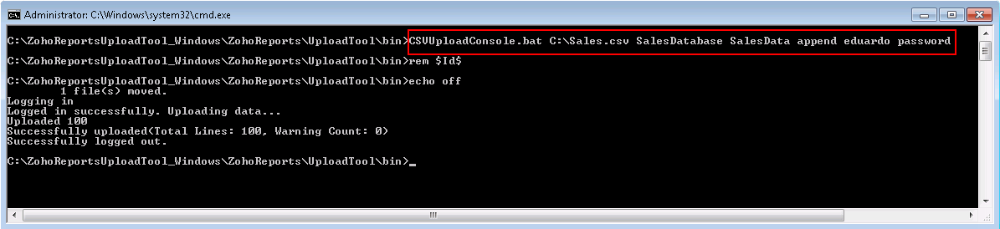
- After successful execution, the data in the CSV file will get uploaded to the specified table in Virtutem Analytics database.
Note: |
|---|
The last upload details will be logged in the <Tool_Home>/logs/csvupload_serverout.txt file. |
The following are the mandatory parameters that should be given as arguments when running the CSVUploadConsole.bat/sh file:
| Parameter Name | Description |
| File Name (file_name) | The CSV file location to be uploaded. |
| Database Name (database_name) | The name of the database in Virtutem Analytics into which the CSV file is to be uploaded. |
| Table Name (table_name) | The table name into which the CSV file is to be uploaded. |
| Import Type | Set one of the following as Import Type . · APPEND - appends the CSV data to the end of the table. · UPDATEADD - updates existing data and appends new data. For this you need to configure ZOHO_MATCHING_COLUMNS in common_params.conf in the conf directory. · TRUNCATEADD - Deletes the existing data and adds new data. |
| User Name (zohoreports_username) | Your Virtutem Analytics account login name |
| Password (zohoreports_password) | Password for accessing your Virtutem Analytics account. |
The configuration file common_params.conf in /conf directory provides parameters that Upload Tool uses while uploading data. These settings help Virtutem Analytics properly understand the data being imported.
The following table lists the import parameters that can be configured in the common_params.conf file for uploading data from CSV files - Console mode.
Note: |
|---|
You will not find all the below given parameters present in the configuration file (except mandatory ones). In case you do not find them, add them into the file and provide the required value as specified below. |
| Parameter | Possible Values | Description |
| ZOHO_CREATE_TABLE | · True · False | Optional · True - New table will be created in the specified database with the said name and then the data will be imported. If the table already exists in the database, then the data will be imported into it. · False - The data will be imported into the specified table. If the table does not exist in the specified database then it throws an error. Default value is false . |
| LINES_TO_SEND |
| Optional er of row for each batch. |
| ZOHO_FIRST_ROW_HEADER | · True · False | Optional · True - First row contains the column header names. · False - First row does not contain the column headers. In this case it is mandatory to specify the column header names for the parameter ZOHO_COLUMN_HEADER_NAMES (described next). Default is true. |
| ZOHO_COLUMN_HEADER_NAMES | Column Names with comma separator | This parameter is mandatory when the ZOHO_FIRST_ROW_HEADER is set to false |
| ZOHO_DATE_FORMAT | Format of the date. | Optional |
| ZOHO_MATCHING_COLUMNS** | List the column names separated by comma. | This parameter is mandatory when the ZOHO_IMPORT_TYPE is set to UPDATEADD . Set this parameter to column names based on which the existing records in the table need to be matched. If the record already exists in the table then it will be replaced with the new values in the uploaded CSV file. Remaining rows will be added at the end of the table. |
| ZOHO_AUTO_IDENTIFY | · True default · False | This parameter specifies whether the tool should automatically identify the delimiter or not. · True -The tool will automatically identify the delimiter (ZOHO_DELIMITER parameter) and text qualifier (ZOHO_QUOTED parameter) in the CSV file that is being imported. By default this will be set to true . · False - You need to specify the delimiter and text qualifier explicitly. The following table lists the parameters to specify the delimiter and text qualifier. In case this parameter is set to false, then you need to specify the delimiter and text qualifier usin the parameters in the table below. |
| ZOHO_SKIPTOP |
| Optional |
| ZOHO_THOUSAND_SEPARATOR | · 0 · 1 · 2 · 3 | Optional · 0 - COMMA · 1 - DOT · 2 - SPACE · 3 - SINGLE QUOTE Default is 0. |
| ZOHO_DECIMAL_SEPARATOR | · 0 · 1 | Optional The following is the list of parameter values and the corresponding decimal separator. · 0 - DOT · 1 - COMMA Default value is 0. |
| ZOHO_FILE_ENCODING | · UTF-8 · UTF-16 · GB18030 · Shift_JIS | Optional Default value is UTF-8 . |
| ZOHO_REMOVE_BOM | · True · False | Optional Set this to true , the tool will identify the BOM and remove the BOM from the file. You can also specify the BOM type (UTF-16LE,UTF-16BE), if you know the type. |
| ZOHO_CANOVERRIDE | · True · False | Optional · True - The tool will stop the current import process and overwrite the table with new import. · False - The tool will not disturb the current import process and will cancel the new import request. Default value is false. |
| ZOHO_ON_IMPORT_ERROR | · ABORT · SKIPROW · SETCOLUMNEMPTY | This parameter controls the action to be taken in case there is an error during import. · ABORT - In case of any error, the import will be aborted. · SKIPROW - In case of any error, the specific row(s) in which error occurred will be skipped and then continue importing the rest of the data. · SETCOLUMNEMPTY - In case of any error, the value of the specific cell(s) in which error occurred will be set to empty and then continue importing the rest of the data. Default value is SETCOLUMNEMPTY |
| Parameter | Possible Values | Description |
| ZOHO_COMMENTCHAR |
| Comment Character. The CSV row will be skipped, If the comment character is found at the beginning of the row. The above will skip the rows starting with $ character while importing. |
| ZOHO_DELIMITER | · 0 · 1 · 2 · 3 | Specifies the delimiter which separates the values in the file. The following is the list of parameter values and the corresponding delimiter: · 0 - COMMA · 1 - TAB · 2 - SEMICOLON · 3 - SPACE |
| ZOHO_QUOTED | · 0 · 1 · 2 | Specifies the Text Qualifier which surrounds string values in the CSV file, if available. The following is the list of parameter values and the corresponding text qualifier: · 0 - None · 1 - SINGLE QUOTE · 2 - DOUBLE QUOTE |
The following screenshot illustrates the common_params.conf file showing some of the import parameters:
.jpg)
Using Upload Tool you can periodically schedule uploading data from a CSV file. With this mechanism, you can have the latest data from your application synced into Virtutem Analytics , and the reports that you create over this data stay current.
You can setup a periodic schedule for the CSV Console mode utility using the Operating System Scheduler feature as explained below
Setting up Schedule in Windows Operating System:
- Click Start -> Settings -> Control Panel ->Scheduled Tasks.
- Click Add Scheduled Task. The " Schedule Task " wizard will open.
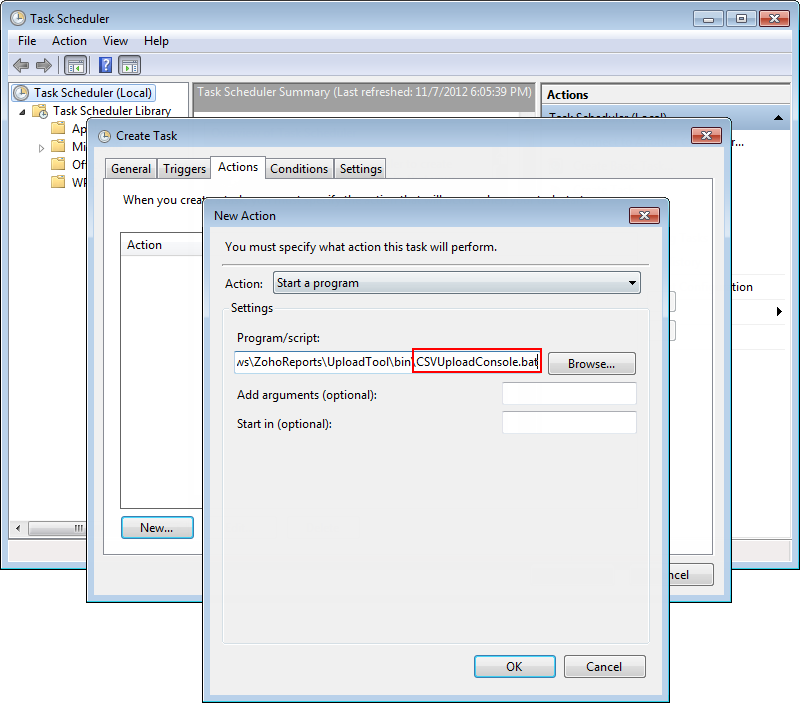
- Click Action > Create Task to open the Create Task dialog.
- Open Action Tab and then click New .
- Click Browse button and select the upload tool command line batch file CSVUploadConsole.bat in the Program/Script field. Ensure that you have provided the necessary settings in the Upload tool configuration files.
- In the Add Argument field enter the command line arguments for the batch file. i.e., full path of the CSV file to be uploaded, Virtutem Analytics Database name, Table name, Type of Import, Virtutem Analytics User Name and Password the same order as given in the following snippet.
CSVUploadConsole.bat C:\CSVdemo.csv DemoDB DemoTable APPEND eduardo password
- Specify the time of schedule in the Start in field.
- Click OK to save the task
Setting up Schedule in Linux or Mac Operating System:
- In Linux or Mac, you can use the crontab command for scheduling the migration process using the command line script CSVUploadConsole.sh. (Checkout Simple Help on Linux Crontab command )
- Ensure you have provided the necessary setting in the Upload tool configuration files.
Points to consider, while scheduling periodic upload using Command line mode:
- It is the users, responsibility to ensure that the latest data is uploaded into Virtutem Analytics by setting the schedule interval accordingly. Also ensure that the CSV data file is located in the right place for the tool to access it.
- In case you have deleted few records in the CSV file being uploaded, the only option to remove these records from Virtutem Analytics database is to set the Import Type as TRUNCATEADD . This will delete all the records in the table and then add the data available in the CSV file.
- In case you have modified few records in the CSV file being uploaded, then to get this modified in Virtutem Analytics database, set the Import Type as UPDATEADD and specify the matching columns. The Upload Tool will compare the existing table in Virtutem Analytics with the CSV file being uploaded based on the matching columns. If the record already exists in the table then it will be replaced with the new values available in the CSV being uploaded. And the rest of the data will be appended at the end.
To view the data that you have uploaded,
- Login to http://analytics.virtutem.com
- Click on the corresponding Database name under My Databases.
- Click on the corresponding table at the Left to open the table and view the uploaded data.
Frequently Asked Questions
Troubleshooting Tips
- I get "The host did not accept the connection within timeout of 15000 ms" while trying to upload data using Upload Tool. How to solve it?
- I get an error message as ‘out of memory’ while trying to upload the file. How can I solve this error?
- I get "Error!!! Sorry, you cannot upload files that exceed 50MB in size"while uploading data using Upload Tool. How to overcome this?
- I get an error message as "Another import is in progress in this table started by the user 'User name' at 'time of import'." How to overcome this?
- I get a message as "ZOHO_MATCHING_COLUMNS is not present in the request parameters list". How to solve it?
- I get "Error!!! Column "Column_Name" is present in match columns butnot in selected columns" while uploading data. How to overcome this?
- I get error/ZohoReports/UploadTool/bin/UploadFromDB.sh: line 15: java: command not found.
- I get an error message as "Maximum Concurrent User Tickets Limit Exceeded". How to solve this?